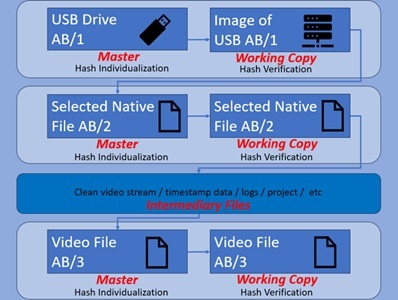
Establishing an immediate cryptographic hash locks the Master Copy, ensuring any subsequent working derivative remains fully verifiable in court.
by David Spreadborough, Senior Forensic Video Analyst, Amped Software
If you ask a Crime Scene Investigator about their ideal shift, they may describe full latent prints on non-porous surfaces, well-lit bloodstain patterns, and a clean chain of custody. What they rarely dream of is crouching in the cobweb-draped back closet of a convenience store, wrestling with a dust-caked security DVR that hasn't seen a clock update since 2011 and whose screen is two rooms away.
Yet, more often, these DVRs are helping drive investigations every day. While physical evidence—DNA, trace evidence, latent prints, and toxicology—remains the backbone of forensic science, the modern crime scene is saturated with pixels. From commercial Video Surveillance Systems (VSS) and residential doorbell cameras to cloud storage and witness smartphones, field personnel are increasingly expected to play digital first responder.
The trouble is, while physical evidence comes with clear collection protocols (we wouldn't document a bloodstain by soaking it with a paper towel and hoping for the best), digital evidence is frequently treated like a casual file transfer. A quick export here, a cell phone recording of a monitor screen there, and suddenly critical evidence vanishes into a cloud of compression artifacts.
Understanding field video acquisition protocols ensures you preserve raw data, protect the chain of custody, and save your forensic lab analyst from a severe headache later on.
Digital Multimedia Evidence is Volatile Physical Data
A recurring myth in field operations is that video recovery is simple because "it’s just a file." In truth, Closed-Circuit Television (CCTV) operates in a chaotic, unstandardized digital Wild West. Proprietary file structures, aggressive compression algorithms, and obscure codecs dominate the landscape.
When approaching video evidence on scene, field investigators should keep four foundational rules in mind:
- Treat Video as Physical Evidence: Digital files require the same rigorous logging, hashing (a digital version of cataloging), and chain-of-custody documentation as physical items.
- Preserve Volatile Data: CCTV storage drives operate on continuous loop recording. If footage is not identified, triaged, and isolated quickly, the system may quickly overwrite the suspect's getaway with footage of an empty parking lot.
- Ensure Proper Decoding: Video compression relies on complex mathematical algorithms, called codecs. Selecting the wrong export format can alter the underlying data, permanently stripping away structural metadata, playback timing, and crucial details.
- The Time-Offset Reality Check: CCTV system clocks famously exist in their own temporal dimension—often 20 minutes fast, two hours slow, or set to a time zone that doesn't exist. Conducting an immediate time check by comparing the DVR's display clock against an atomic reference clock, calling dispatch, or checking your phone is vital for calculating exact time offsets.
A quick, five-minute shortcut taken on scene, such as pointing a smartphone or body worn camera at a glare-ridden security monitor, might seem like a time-saver, but it trades court-admissible science for a low-res home movie.
Navigating On-Scene Acquisition Tiers
Depending on scene access, equipment availability, and legal authority, recovering video generally falls into three operational tiers:
Tier 1: Closed-Box Acquisition via Storage Media
Closed-box acquisition involves operating the DVR or NVR through its native menu interface without taking off the chassis lid.
- Native Streams and Transcoded Containers: When exporting via a USB flash drive or optical disc, system menus usually present export options. You will often see raw native formats (such as .h264, .h265, or proprietary extensions) alongside common container formats like .avi. Always choose the raw native option when possible. Converted .avi files, for example, regularly drop timing metadata, skip frames, or apply heavy secondary re-compression.
- Backup Types: Favor file-based exports over time-based backups. Time-based exports on older units frequently cut off keyframes (the main picture that helps other frames play correctly) or can introduce file corruption during generation.
Tier 2: Network Access and On-Scene Assessment
When system menus are locked, password-protected (with a code the store manager forgot three years ago), or physically awkward to navigate, connecting directly via a network cable offers a clean alternative.
- Bypassing Interface Bottlenecks: Connecting a field laptop directly to the device via an Ethernet connection allows you to bypass buggy user interfaces and download raw data directly. This can take a bit of practice to get to work, but rest assured we have help on our blog for you.
Tier 3: Open-Box Extraction and Physical Hardware Removal
When the system is damaged, inaccessible, or part of a major incident investigation, it may be time to collect the entire device and then grab a screwdriver. When you do this, know that there may be a few precautions to make sure you don’t alter the evidence or spoil other data.
- Write-Blocked Disk Imaging: Removing the internal Hard Disk Drive (HDD) and connecting it to a hardware write-blocker allows field personnel to perform byte-for-byte forensic imaging or file carving without the risk of erasing evidence.
- The Boot-Up Gamble: Powering down a suspect DVR is always a calculated risk. If the drive has bad sectors or failing heads, it might never boot up again. Always consider performing a full network or media backup before pulling the power cord.
Cloud Submissions and Public Video
In modern field work, video increasingly arrives from third parties, whether it is residential footage from doorbells or uploads from helpful witnesses.
While web-based upload portals save travel time, they bring unique technical traps:
- Automatic Transcoding: Cloud platforms (like Nest or Ring) frequently transcode user uploads into lower-bitrate versions to conserve server storage. Utilizing dedicated administrative services (such as Google Takeout for Nest systems) helps retrieve full-resolution archives.
- Preserving Individualization: Uploaded files often arrive with generic filenames (e.g., video_1.mp4). Files must be individualized and cryptographic hashes (such as SHA-256) generated immediately upon receipt to guarantee original authenticity.
Master Copies vs. Working Copies
Once you have the evidence, preserving it so you can be sure the same video you collected today is what you submit in court two years later. The distinction between Master and Working copies is standard digital forensic science, yet it remains one of the most common points of failure in video evidence handling:
- Master Copy: The original, primary digital asset produced directly from the acquisition. It must be write-protected, securely stored, and left pristine.
- Working Copy: A bit-for-bit duplicate created exclusively for analysis, frame extraction, enhancement, and investigative review.
If you convert, trim, or process a video file, it is no longer a master, it is a derivative working exhibit that requires a clear documented lineage tracing back to the master asset.
The Ultimate Field Acquisition Kit
Just as you wouldn't head to a crime scene without latent print powder and tape, field personnel responsible for video collection need a dedicated tool kit.
- Level 1 (Basic Field Recovery): Flash drives formatted in FAT32/exFAT (older DVRs hate NTFS), optical discs (CD-R/DVD-R), a USB optical drive, and a multi-interface USB mouse (with a PS/2 adapter for legacy machines).
- Level 2 (Network & Triage): A field laptop equipped with dedicated triage and viewing software (such as Amped Replay), network crossover/patch cables, hardware write-blockers, and partition utility software.
- Level 3 (Hardware Extraction): Precision screwdrivers, IDE/SATA write-blockers, forensic HDD cloners, compressed air, and spare internal hard drives.
Elevating Digital Field Science
Digital multimedia evidence is no longer an afterthought. It is physical evidence wrapped in code. Treating video collection with the same meticulous care, patience, and scientific rigor as biological or trace evidence protects the integrity of your investigation and ensures your cases stand up in court.
The next time you are called out to a scene, bring your dusting powder, your alternate light sources, and your swab kits, of course. But don't forget your write-blocker, a handful of formatted flash drives, and a healthy dose of digital patience.
To dive deeper into technical acquisition workflows, equipment breakdowns, and detailed step-by-step field guides, check out the complete CCTV Acquisition Series on our website.
Lastly, collection of video evidence is just the start. When you get back to the lab or office, just like you might further process physical evidence items with additional tools, techniques, and chemical applications, you need forensic video analysis tools to analyze, compare, and present your video evidence. Amped Software’s Amped FIVE is designed to do just that.
About the author
David served as a UK Police Officer for 24 years, the final 12 of which were spent as a CCTV investigator. He was the first LEVA certified Forensic Video Analyst in Europe. Since working with Amped Software, David has provided a key role in the development of Amped Software’s technical training, as well as spreading his passion for jurisprudence reform through the latest technological innovations. He is still a practicing forensic video analyst and has frequently been called as an expert witness to assist legal teams and law enforcement with on-going criminal investigations. For more information, or to see how Amped FIVE. can help you with every piece of your image and video evidence, contact us at [email protected]